5 Simple Steps for code review:

1. Correct:

Does the code do what it’s supposed to?

Does it handle edge cases?

Is it adequately tested to make sure that it stays correct even when other engineers modify it?

Is it performant enough for this use case?

2. Secure:

Does the code have vulnerabilities?

Is the data stored safely?

Is personal identification information (PI) handled correctly?

Could the code be used to induce a DOS?

Is input validation comprehensive enough?

3. Readable:

Is the code easy to read and comprehend?

Does it make clear what the business requirements are (code is written to be read by a human, not by a computer)?

Are tests concise enough?

Are variables, functions and classes named appropriately?

Do the domain models cleanly map the real world to reduce cognitive load?

Does it use consistent coding convention?

4. Elegant:

Does the code leverage well-known patterns?

Does it achieve what it needs to do without sacrificing simplicity and conciseness?

Would you be excited to work in this code?

Would you be proud of this code?

5. Altruist:

Does the code leave the codebase better than what it was?

Does it inspire other engineers to improve their code as well?

Is it cleaning up unused code, improving documentation, introducing better patterns through small-scale refactoring?

My Learning Notes on Apache Kafka


Why Apache Kafka?

  • Distributed
  • Resilient
  • Fault Tolerant
  • Highly Horizontal Scalability:
    • Can scale to 100s of brokers
    • Can scale to millions of messages per second
  • High performance (latency of less than 10 ms) – real time
  • High Throughput
  • Open Source


Use cases of Kafka:

  • Messaging System – Millions of messages can be sent and received in real time, using Kafka.
  • Activity Tracking – Kafka can be used to aggregate user activity data such as clicks, navigation and searched from different websites of an organization and such user activities can be sent to a a real time monitoring system and hadoop system for offline processing.
  • Real Time Stream Processing – Kafka can be used to process a continuous stream of information in real time and pass it to stream processing systems such as Storm.
  • Log Aggregation  Kafka can be used to collect physical log files from multiple systems and store them in a central location such as HDFS.
  • Commit Log Service – Kafka can be used as an external commit log for distributed systems.
  • Event Sourcing – A time ordered sequence of events can be maintained through Kafka.
  • Gather metrics from many different locations
  • Application Logs gathering
  • Stream processing (with the Kafka Streams API or Spark for example)
  • Decoupling of system dependencies
  • Integration with Spark, Flink, Storm, Hadoop and many other Big Data technologies


Kafka solves the following problems:

  • How data is transported with different protocols (TCP, HTTP, REST, FTP, JDBC, gRPC, etc)
  • How data is parsed for different data formats (Binary, CSV, JSON, Avro, Thrift, Protocol Buffers, etc..)
  • How data is shaped and may change.Decoupling of Data Streams & Systems

Source Target Decoupling


Decoupling Kafka


Apache Kafka Architecture:


Kafka Architecture


Kafka Big Picture


Kafka Messaging

KAFKA JARGONS:

BROKERS, PRODUCERS, CONSUMERS, TOPICS, PARTITIONS AND OFFSETS:

Topics:

Topics are a particular stream of data.

  • Similar to a table in a database (without all the constraints)
  • You can have as many topics as you want
  • A topic is identified by its name.
  • Topics are split into Partitions.

Example:

Topics Example


Partitions:

  • Partitions are similar like columns in a table
  • Each partition is ordered.
  • Each message within a partition gets an incremental id, called offset.
  • You as a user have to specify the number of Partitions for a Topic.
  • The first message to Partition 0 starts with offset 0 then increments thereafter, where offsets can go to infinite, since they are unbounded.
  • Each Partition can have different number of messages (basically offsets), since they are independent

Partitions Overview


Offsets & Few Gotcha’s:

  • Offsets are like primary id of a Column, which keeps on incrementing and cannot be changed or updated.
  • Offset only have a meaning for a specific partition.
    • Which means Partition 0, Offset 0 is different from Partition 1, Offset 0.
  • Ordered is only guaranteed only within a partition (not across partitions)
  • Data in Kafka is kept only for a limited time (default retention period is one week)
  • Offsets keep on incrementing, they can never go back to 0.
  • Once the data is written to a partition, it can’t be changed (Data within a portion is immutable). If you want to write a new message, you write it at the end.
  • Data is assigned randomly to a partition unless a key is provided.


Brokers:

  • A Kafka cluster is composed of multiple brokers (servers)
  • Each broker is identified with its ID (integer). It cannot be named like “My Broker” or something.
  • Each broker contains certain topic partitions. Each broker contains some kind of data but not all data, because Kafka is distributed.
  • After connecting to any broker (called a bootstrap broker), you will be connected to entire cluster
  • A good number to get started is 3 brokers, but some big clusters have over 100 brokers.

Cluster of Brokers Example:

Cluster of Brokers


Brokers and Topics

  • There is no relationship between the Broker number and the Partition Number
  • If there is a topic with more than the number of brokers, then any one of the randomly selected broker will have more partitions for that topic to equal the total number of portions for the topic.
    • Ex: If Topic -C with 4 partitions, then any one of the broker (101, 102, 103) will have more than one Partition.

Broker and Topic Partitions

Topic Replication Factor:

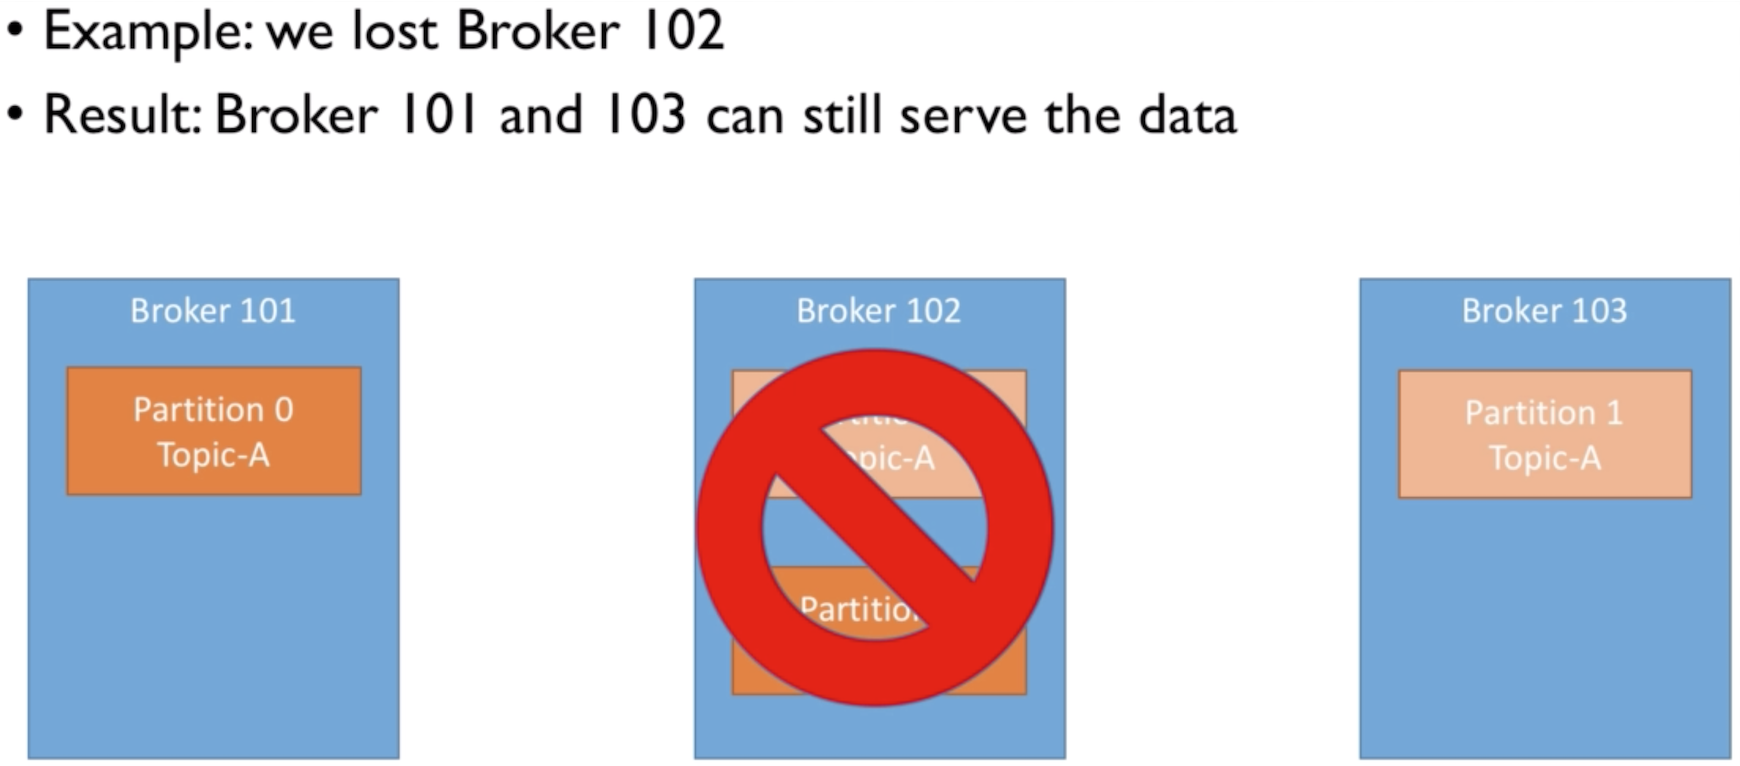
  • Topics should have a replication factor > 1 (usually between 2 and 3)
  • This way if a broker is down, another broker can serve the data.


Topic Replication Factor

Topic Replication Factor Failure


Concept of Leader for a Partition

  • At any given time, ONLY ONE broker can be leader for a given partition.
  • ONLY that leader can receive and serve data for a partition
  • The other brokers will synchronize the data.
  • Therefore each portion has one leader and multiple ISR (in-sync replica)
  • If Broker 101 is Lost, a ELECTION happens, the Partition 0 on Broker 102 becomes the Leader (because it was in sync replica before). When Broker 101 gets back Alive, it tries to become the leader again after replicating the data back from initial ISR (partition 0 on broker 102). All this is handled by Kafka internally.

What decides Leader’s and ISR’s are done through Zookeeper.

STAR indicates the LEADER

Leader of a Partition


Producers:

  • Producers write data to topics (which is made of partitions)
  • Producers automatically know to which broker and partition to write to, so the developer doesn’t need to know that.
  • In case of Broker failures, Producers will automatically recover.
  • If producer sends data without a key, then data is sent in Round Robin Fashion a little bit of data to each one of the brokers in the cluster.
  • Producer can choose to receive acknowledgement of data writes.
  • There are 3 kinds of Acknowledgement modes
    • ACKS=0 -> Producer won’t wait for acknowledgment (possible data loss)
    • ACKS=1 -> Producer will wait for leader acknowledgment (limited data loss). This is the default.
    • ACKS=all -> Leader + replicas acknowledgment (no data loss)


Producers


Producers with Message Keys:

  • Producers can choose to send a KEY with a message. A key can be a string, number, etc..,
  • if key== null, data is sent round robin to all brokers in the cluster
  • If a key is sent, then all messages for that key will always go to the same partition.
  • A key is basically sent if you need message ordering for a specific field. (ex: truck_id)
  • If a key chooses to go to a Specific partition, it will ALWAYS go that same partition. We CANNOT say that a particular key goes to a particular partition.
    • Ex: if data with key “truck_id_123” is going to partition 0, then the producer sending the data with key truck_id_123 will ALWAYS go to partition 0.
    • Similarly if data with key “truck_id_345” is going to partition 1, then the producer sending the data with key truck_id_345 will ALWAYS go to partition 1.
  • The KEY to PARTITION is guaranteed by Key Hashing technique, which depends on the number of partitions.

Producers with Message Keys


Consumers

  • Consumers read data from a topic (identified by name)
  • Consumers know which broker to read from
  • In case of broker failures, consumers know how to recover
  • Data is read in order within each partitions
  • There is no Reading in Order between Partitions (see image above for Partition 1 and Partition 2.)

Consumers


Consumer Groups

How are the consumers reading data from all these partition groups?

  • Consumers read data in consumer groups.
  • Consumer can be any client like java application or any other language we are using or can be a command line utility
  • Each consumer within a group reads from exclusive partitions
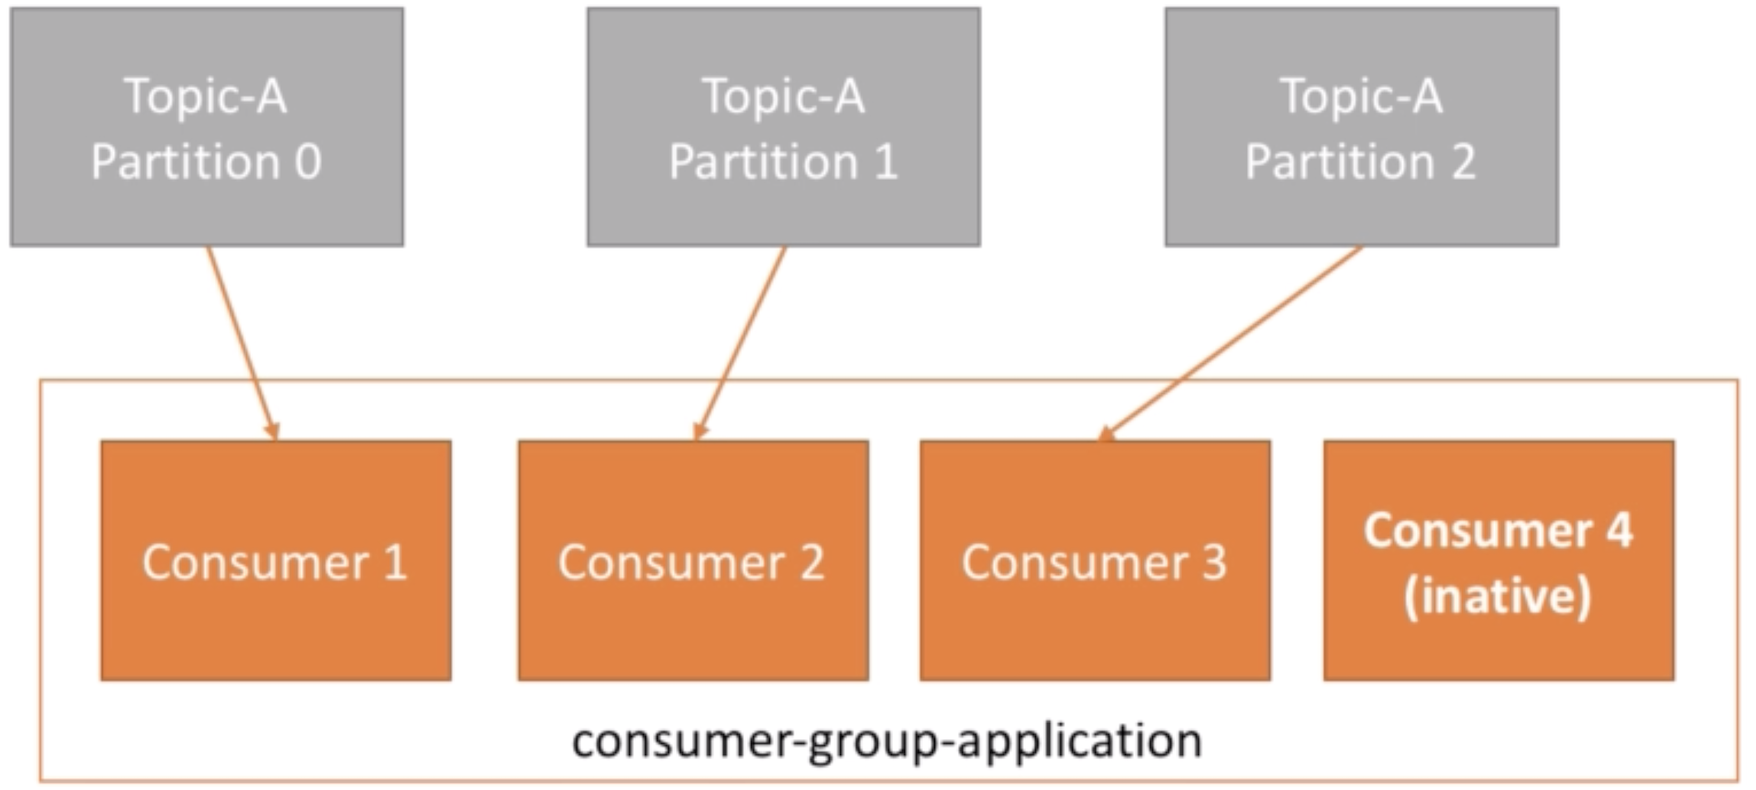
  • If you have more consumers than partitions, some consumers will be inactive.

Consumer Groups

What if you have too many consumers?

  • If you have more consumers than partitions, some consumers will be inactive.
  • In below, if consumer 3 goes down, then consumer 4 becomes active. Ideally we have same number (at most) of consumers as partitions.

Many Consumers than Partitions


Consumer Offsets

  • Kafka stores the offsets at which a consumer group has been reading
  • The offsets committed live in a Kafka topic named “__consumer_offsets” (double underscore followed by consumer then followed by a single underscore then finally followed by offsets)
  • When a consumer in a group has processed data received from Kafka, the consumer then should be committing the offsets to the topic name “__consumer_offsets”. This is done automatically in Kafka.
  • If a consumer dies, it will be able to read back from where it left off, thanks to the committed consumer offsets!.

Consumer Offsets


Delivery Semantics for Consumers

  • Consumers choose when to commit offsets
  • There are 3 delivery semantics:

At most once:

  • Offsets are committed as soon as the message is received.
  • If the processing goes wrong, the message will be lost (it won’t be read again)

At least once (usually preferred):

  • Offsets are committed only after the message is processed.
  • If the processing goes wrong, the message will be read again.
  • This can result in duplicate processing of messages. Make sure your processing is idempotent. (i.e processing again the messages won’t impact your systems)

Exactly Once:

  • Can be achieved for Kafka to Kafka workflows using Kafka Streams API. May be it can achieved by Spark an other stuff…
  • For Kafka to External Systems (like a database) workflows, use an idempotent consumer. (to make sure there are no duplicates whilee inserting in the final database)

Kafka Broker Discovery

  • Every Kafka broker is also called a “bootstrap server”
  • That means that you only need to connect to one broker, and you will be connected to the entire cluster.
  • Each broker know about all brokers, topics and partitions (metadata)
  • Kafka Client can connect to any broker automatically.

Kafka Broker Discovery


ZOOKEEPER

  • Zookeeper manages brokers. It holds the brokers together (keeps a list of them)
  • Zookeeper helps in performing leader election for partitions, when a broker goes down a new replicated partition of another broker becomes the leader.
  • Zookeeper sends notifications to kafka in case of changes (e.g new topic, broker dies, broker comes up, delete topics, etc…)
  • Kafka cannot work without a Zookeeper. So we first need to start Zookeeper.
  • Zookeeper by design operates with an odd number of servers (3,5,7) in production.
  • Zookeeper also follows the concept of Leaders and Followers. Zookeeper that has a leader (handles writes) the rest of the zookeeper servers are followers (handles reads)
  • Zookeeper does NOT store consumer offsets with Kafka > v0.10


Zookeeper for kafka


Kafka Guarantees

  • Messages are appended to a topic partition in the order they are sent.
  • Consumers read messages in the order stored in a topic partition
  • With a replication factor of N, producers and consumers can tolerate up to N-I brokers being down.
  • This is why a replication factor of 3 is a good idea:
    • Allows for one broker to be taken down for maintenance
    • Allows for another broker to be take down unexpectedly
  • As long as the number of partitions remains constant for a topic (no new partitions), the same key will always go to the same partition


Resources:

https://www.udemy.com/apache-kafka/learn/v4/

https://youtu.be/U4y2R3v9tlY

Source Code:

https://courses.datacumulus.com/kafka-beginners-bu5

http://media.datacumulus.com/kafka-beginners/code.zip

https://github.com/simplesteph/kafka-beginners-course

API Management & Swagger vs RAML vs API Blueprint vs LoopBack

API management is the process of overseeing application programming  interfaces (APIs) in a secure, scalable environment. The goal of API management is to allow organizations that either publish or utilize an API to monitor the interface’s lifecycle and ensure the needs of developers and applications using the API are being met.

API management needs may differ from organization to organization, but API management itself encompasses some basic functions, including security, monitoring and version control.

API management has become increasingly important due to business’s growing dependency on APIs, a significant rise in the number of APIs they depend on and the administrative complexities APIs introduce. The requirements and process of building and managing APIs is different than most other applications. In order to be utilized properly, APIs require strong documentation, increased levels of security, comprehensive testing, routine versioning and high reliability. Because these requirements often go beyond the scope of the software-based projects organizations typically run, the use of API management software has become popular.

API management software and tooling

API management software is built with the intention of making API design, deployment and maintenance easier and more efficient. Although each individual API management tool has its own unique set of features, most of them include essential features like documentation tools, security, sandbox environments, high availability and backward compatibility.

API management software tools typically provide the following functions:

  1. Automate and control connections between an API and the applications that use it.
  2. Ensure consistency between multiple API implementations and versions.
  3. Monitor traffic from individual apps.
  4. Provide memory management and caching mechanisms to improve application performance.
  5. Protect the API from misuse by wrapping it in security procedures and policies.

API management software can be built in-house or purchased as a service through a third-party provider. The open API movement, spearheaded by big-name companies like Facebook, Google and Twitter, led to significantly reduced API dependency upon conventional service-oriented architecture (SOA) in favor of more lightweight JSON and REST services. Some API management tools are capable of converting existing SOAP, JMS or MQ interfaces into RESTful APIs or JSON content.

api management benefits

Swagger vs RAML vs API Blueprint vs LoopBack


there can only be one


Swagger RAML API Blueprint LoopBack
Description It defines a standard, language-agnostic interface to REST APIs which allows both humans and computers to discover and understand the capabilities of the service without access to source code, documentation, or through network traffic inspection via Open API Specification(OAS) RESTful API Modeling Language (RAML) is a YAML based language which makes it easy to manage the whole API lifecycle from design to sharing. It’s concise – you only write what you need to define – and reusable. It is machine readable API design that is actually human friendly. A powerful high-level API description language for web APIs. Its syntax is concise yet expressive. With API Blueprint you can quickly design and prototype APIs to be created or document and test already deployed mission-critical APIs.


It is an open source Node.js API framework from StrongLoop. It is built on top of Express optimized for mobile, web, and other devices.


Pros Supports API first design


Open Source


Can execute api calls from the documentation


Free to use

Customizable

Mature, clean spec


Easy to implement in .Net


Coverage

Vibrant and active community


Scaffolding


API Visualization


Now Supports OAS contracts


API first design


Follows API Specification


Human Readable


API Documentation


Design Patterns & Code Reuse


Unit Testing


API Modeling


Automatic Generation of Mule flow


API Mocking


SDK Generation

Simple, easy to use, more artistic site
Cons Requires multiple specifications for some tools, including dev and QA

Doesn’t allow for code reuse, includes, or extensions

Lacks strong developer tools

Requires schemas for all responses

No Hypermedia support.

Lacks strong documentation and tutorials outside of specification

Limited code reuse/extensions

Multiple specifications required for several tools, including dev and QA

Poor tooling support for newer versions


NodeJS specific Only


References:

https://searchmicroservices.techtarget.com/definition/API-management

https://medium.com/@clsource/swagger-vs-raml-vs-api-blueprint-daccab31f0f2

https://blog.vsoftconsulting.com/blog/is-raml-or-swagger-better-for-building-apis

https://swagger.io/blog/news/mulesoft-joins-the-openapi-initiative/

https://strongloop.com/strongblog/enterprise-api-swagger-2-0-loopback/

Set Request Headers in Swagger-UI

For the last 2 days, I was facing a issue with setting Global Request headers to Springfox’s Swagger-UI (version 2.8.0) for a SpringBoot Application.

The issue was more related to the new Swagger version 2.8.0 and does not any issues in prior versions. In the below code, I am only presenting the cause and the solution. Assuming the developers have prior knowledge of Swagger and its implementation. More implementation details can be found at https://springfox.github.io/springfox/docs/current/#quick-start-guides

@Bean
    public Docket apiSwaggerDocket() {
        return new Docket(DocumentationType.SWAGGER_2)
                .select()
                .apis(RequestHandlerSelectors.withClassAnnotation(Api.class))
                .paths(PathSelectors.any())
                .build()
                .pathMapping("/")
                .genericModelSubstitutes(ResponseEntity.class)
                .useDefaultResponseMessages(false)
                .forCodeGeneration(true)
                .securitySchemes(newArrayList(apiKey()))
                .apiInfo(apiInfo());

    private ApiKey apiKey() {
        return new ApiKey("access_token", "access_token", "header");
    }

Let’s only concentrate on the apiKey() method. The new ApiKey(…) constructor has different argument signatures for different versions of springfox’s swagger.

/**
* http://springfox.github.io/springfox/javadoc/current/springfox/documentation/service/ApiKey.html
* Signature of the ApiKey constructor
* return new ApiKey(name, keyName, passAs);
* 
* name - is the name of the key
* keyName - is the value of the key name
* passAs - you can pass as header or query parameter
*/
// For version 2.6.0
return new ApiKey("Authorization", "Bearer", "header");

Output at swagger-ui
name: Authorization
in: header
value: Bearer

// For version 2.7.0 - This version has reverse the constructor Argument signature
return new ApiKey("Authorization", "Bearer", "header");

Output at swagger-ui
name: Authorization
in: header
value: Bearer

// For version 2.8.0
return new ApiKey("Authorization", "Bearer", "header");

Output at swagger-ui
There is no header displayed in this version of the swagger.

For my current use case, I had to step down the swagger version to 2.7.0.

Alternatively, if one intends to use version 2.8.0, we can have globalOperationParameters to put in use, with all API’s requesting for header

@Bean
    public Docket apiSwaggerDocket() {
        return new Docket(DocumentationType.SWAGGER_2)
                .select()
                .apis(RequestHandlerSelectors.withClassAnnotation(Api.class))
                .paths(PathSelectors.any())
                .build()
                .pathMapping("/")
                .genericModelSubstitutes(ResponseEntity.class)
                .useDefaultResponseMessages(false)
                .forCodeGeneration(true)
                .apiInfo(apiInfo())
                .globalOperationParameters(
                        newArrayList(new ParameterBuilder()
                                .name("access_token")
                                .description("Access Token")
                                .modelRef(new ModelRef("string"))
                                .parameterType("header")
                                .required(true)
                                .build()));
    }

The only drawback using globalOperationParameters, the header is not sticky. Meaning, the same header value is required for each and every API in Swagger, which is not great.

Thanks for reading my post 🙂

More Reading & Resources:

Forward Proxy vs Reverse Proxy

proxies

Forward Proxy Reverse Proxy
Processes Outgoing Requests Processes Incoming Requests
A Forward Proxy is just called a Proxy. When Someone says a proxy, that just means a forward proxy. An example of a forward proxy would be, for example if you work at a big firm, where there are a lot of computers/employees making a request to the same website to go get some information, (an example could be a LDAP server where the backed end service to it gets called most frequently), so this company may setup a forward proxy, so all the employees may send request to this forward proxy, which can do a bunch of things before it forwards the request to the server or a reverse proxy if it has one setup. Even though the server instances endpoints keep changing, the client endpoints remain same. Reverse proxy handles the incoming requests and delegates it to the server instances, even though the server instances scales up or down or if any server node instances fail.
The reverse proxy handles a stable endpoint at the start (before it receives a incoming request), so the client endpoint does not change.
The reverse proxy hides or shield’s the server instances from incoming traffic.
How does the reverse proxy decide to which server instance to route?
A forward proxy can do Content Filtering. May be a administrator at the company has setup up a forward proxy to stop certain malicious, censored, gambling or translation website traffic from coming in to the internal servers or to the internet traffic (external) from going out. A forward proxy acts as the first shield of defence. Reverse Proxy can be used as Load Balancers. There are 2 types of Load Balancers Level 4 & Level 7.
Level 4 Load Balancers can handle UDP/TCP traffic. It’s level 4 because of OSI networking model. They handle traffic by tapping at level 4 of OSI networking model.
Level 7 Load Balancers handle HTTP/HTTPS incoming traffic. It’s Level 7 because it is level 7 in the OSI networking model, which is the Application layer. It can look at URI’s, HTTP Headers. The HTTP Headers can also direct which server instance to direct to.
Also, with Reverse Proxy as a Load Balancer, you can do Server selection, A/B Testing, meaning you can dictate the reverse proxy configuration to direct the traffic based on the amount of incoming traffic load. Example, you can configure it to go to server instance 1 if the incoming traffic is > 10% and go to server instance 2 if the incoming traffic is < 10%
Forward proxy can be used for Caching. It can return the same content to different employees when a request comes in, so it can save a lot of money to the client, by reducing its bandwidth usage, because the cached request does not use the internet. Reverse Proxy can be used as a SSL Termination, where the SSL certificate get authenticated (from the very first request coming the Client side, i.e HTTPS (encrypted)) and all the incoming traffic routing to server instances thereafter can all be just HTTP (non encrypted) instead of HTTPS (encrypted)
A Forward proxy can be used for Logging & Monitoring. Like, may be the company wants to know when the employees are coming to office or what websites are being used frequently or how much data people are downloading. So, all these metrics can be used to better fine tune its internet infrastructure & offices. like may be they need more routers or better wifi signal capability or wired routers. Reverse Proxy can be used for Caching Purpose as well. The very first request can be cached for the later requests, which the reverse proxy can send out. This eventually can save lot of incoming traffic load and a lot of money for the prospective clients.
A forward proxy can be used as Client Anonymization. Meaning, the forward proxy can send less information to the server, like hide the clients information before sending out the request to server. This way the clients feel much secure, that they are not being tracked or stored any of their location or identity information to server. Reverse Proxy can be used to do Authentication & Validation. Like the first incoming request from the client may send some authorization information in HTTP Header and may send some cookie information and then the reverse proxy may authenticate it and then send the request to its server instances just to fetch data.
 Forward proxy sits right in front of the firewall, which blocks outgoing traffic to server. Reverse Proxy can be used to do Tenant Throttling and billing. For example, if some user tampers with a request, lets a say a 1000 requests per second, the reverse proxy can detect this type of requests and can then block it right away and so the server instances doesn’t have to worry about throttling, accounting or bookkeeping. Also since some B2B services get billed for every request that comes in, the reverse proxy can identify the individuals and increment the billing counter for their sent requests and send a monthly incurred billing stats.
Some reverse proxies use Distributed Denial of Service (DDoS) Attacks mitigation. If the reverse proxy sees a lot of requests coming from one single client, then it can stop the requests for about an hour or the next day, so each of the server instances doesn’t need to worry about DDoS attacks.

Source:


Cyber Security – Penetration Testing Checklist

Hello folks,

Below is the list of Penetration Testing checklist notes that were discussed in the OWASP meeting I attended yesterday.

1). Web Applications – Check if a web application is able to identify spam attacks on contact forms used in the website.

2). Proxy Servers – Check if the network traffic is monitored by proxy appliances. Proxy servers make it difficult for hackers to get internal details of the network.

3). Spam Email Filters – Verify if incoming and outgoing email traffic is filtered and unsolicited emails are blocked.

4). Firewalls – Make sure an entire network or computers are protected with a firewall.

5). Exploits – Try to exploit all servers, desktop systems, printers and network devices (Within scope).

6). Verification – Verify that all usernames and passwords are encrypted and transferred over secured connections like HTTPs.

7). Cookies – Verify information stored in website cookies. It should not be in readable format.

8). Vulnerabilities – Review previously found vulnerabilities to check if the fix is working.

9). Open Ports – Ensure there are no unnecessary open ports on a network.

10). Telephones – Check all telephone(VOIP) devices.

11). WiFi – Test Wifi network security.

12). HTTP Methods – Review HTPP methods. PUT and DELETE methods should not be enabled on web server.

13). Passwords – Password should be at least 8 character long containing at least one number and one special character.

14). Usernames – Usernames should not be like “admin” or “administrator”

15). Application Login Pages – Application logins pages should be locked upon few unsuccessful login attempts (Brute force attacks).

16). Error messages – Error messages should be generic and not mention specific error details like “Invalid username” or “Invalid Password”.

17). Special Characters – Verify if special characters, HTML tags and scripts are handled properly as an input value.

18). Internal System Details – Internal system details should not be revealed in any of the error or alert messages.

19). Custom Error Messages – Custom error messages should be displayed to the end users in case of web page crash.

20). Registry Entries – Review the use of registry entries. Sensitive Information should not be kept in registry.

21). Scanning Files – All files must be scanned before uploading to server.

22). Sensitive Data – Sensitive data should not be passed in URL’s while communicating with different internal modules of the web application.

23). No Hard-Coded usernames or passwords – There should not be any hard coded username of password in the system.

24). Input Fields – Check all input fields with long input strings – With and Without spaces.

25). Password Functionality – Ensure reset password functionality’s secure.

26). SQL Injection – Check application for Cross Site Scripting.

27). XSS – Check application for Cross Site Scripting.

28). Input Validations – Important input validations should be done at server side instead of Javascript checks at client side.

29). System Resources – Critical resources in the system should be available to authorized persons and services only.

30). Access Permissions – All access logs should be maintained with proper access permissions.

31). Ending Sessions – Check that user sessions end upon log off.

32). Directory Browsing – Verify that directory browsing is disabled on the server.

33). Up To Date Versions – Verify that all applications and database versions are up to date.

34). URL Manipulation – Review URL manipulation to make sure a web application is not showing any unwanted information.

35). Buffer Overflow – Check memory leak and buffer overflow.

36). Brute Force Attacks – Check if systems are safe from Bruce Force Attacks – use a trial and error method to find sensitive information like passwords.

37). DoS (Denial of Service) – Ensure the system or network is secured from DoS (Denial-of-service) attacks.


All credits to Rob Taylor

Hope you’ve liked it.

JSHint Errors

When using a simple ternary operator with JSHint, may cause the build error shown below,

someExpressionThatIsEitherTrueOrFalse ? someFunctionThatIsCalledIfExpressionIsTrue(x, y) :
setOtherVariableIfExpressionIsFalse = true;
^ Expected an assignment or function call and instead saw an expression.

Solution

Add below JSHint Comments where expression has been written

/* jshint expr: true */

Ex:

/* jshint expr: true */
nameController.isMiddleNameNullOrEmpty ? submit() : validate();

Note: The important thing to remember is to have this JSHint comments (/* jshint expr: true */ ) be used only within the function where the expression is being used, else it would turn off the JShint globally.

All about NPM (Node Package Manager)

All about NPM (Node Package Manager) https://www.npmjs.com/

  • Its about Sharing the Code or Packages or Modules on the node package manager repository.
  • By default node package manager repository is publicly accessible, however there are options to make it private at a price.
  • We can search for packages that have been registered in the registry. Go to https://www.npmjs.com/ and find the Packages or Using the Query URL https://www.npmjs.com/search?q=bower
  • The packages are managed and powered by the CouchDB database.
  • You can also run the published packages on the node package manager over the browser using Runkit @https://runkit.com/npm/npm-demo-pkg29 where “npm-demo-pkg29” is the package I created. This package has a reported method “printMsg()”, which prints “Hello”. You can also share the code https://runkit.com/5801f19682bd9d0014eec77c/580289b7ce0bd500138eec0c

Here are some of the differences between Packages and Modules within NPM

Packages:

  • A “package” is a file or directory that is described by a package.json file. In other words, a package.json file defines a package. For example, if you create a file at node_modules/foo.js and then had a program that did var f = require(‘foo.js’), it would load the module. However,foo.js is not a “package” in this case, because it does not have a package.json.
  • A package is any of:
    • a) a folder containing a program described by a package.json file
    • b) a gzipped tarball containing (a)
    • c) a url that resolves to (b)
    • d) a <name>@<version> that is published on the registry with (c)
    • e) a <name>@<tag> that points to (d)
    • f) a <name> that has a latest tag satisfying (e)
    • g) a git url that, when cloned, results in (a).
  • Even if the package is never published to the npm repository, you can circulate the packages locally and achieve benefits of using npm:
    • if you just want to write a node program, and/or
    • if you also want to be able to easily install it elsewhere after packing it up into a tarball

Modules:

  • A module is any file or directory that can be loaded by Node.js’ require(). For example, if you create a package which does not have an index.js or a “main”field in the package.json file, then it is not a module. Even if it’s installed in node_modules, it can’t be an argument to require().
  • ‘CLI’ packages for example is not modules since they only contain executable command line interface and don’t provide a main field for use in Node.js programs.
  • A module is any of:
    • A folder with a package.json file containing a main field.
    • A folder with an index.js file in it.
    • A JavaScript file.
  • In the context of a Node program, the module is also the thing that was loaded from a file. For example, in the following program:
    var req = require(‘request’)
    we might say that “The variable req refers to the request module”.
  • Most npm packages are modules because, npm packages that are used in Node.js program are loaded with require, making them modules. However, there’s no requirement that an npm package be a module

Here are the list of NPM commands that I use (some of which are the ones that I occasionally use).

npm -v
Gives the version of installed npm

npm install npm@latest -g
Installs the latest version of npm

npm install {packageName}
{packageName} can be any packages that are available on the npm repository. If the Packages are not available then npm CLI will throw error.
npm install {packageName} -g
options: -g
global install. Usually this gets installed in (/usr/local). If this option is not specified, node_modules gets installed in the same directory where you are on the terminal. Check pwd for the current directory.

For uninstalling use npm uninstall {packageName}

Note: Just in case if you do not have permissions to the folder (/usr/local), run the commands using sudo prefix

npm config get prefix
Gives the current directory where npm modules gets installed globally.
Check this https://docs.npmjs.com/getting-started/fixing-npm-permissions if you intend to change permissions.

npm init
This is used to create a package.json with a questionnaire being prompted on CLI.

npm init –yes
option –yes // Creates a default package.json file with default inputs, without asking any questions.

npm install {packageName}  –save This adds entry to package.json’s dependencies attribute.

For removing the dependency use npm uninstall {packageName} – – save

npm install {packageName}  –save-dev
This adds entry to package.json’s devDependencies attribute

For removing the dependency use npm uninstall {packageName} –save-dev

npm update
Updates the dependencies of the the packages defined in the package.json file. Note: The folder should contain package.json file

For updating all packages globally (/usr/local), use option -g; npm update -g

npm outdated
Check if the packages are outdated.

For checking all outdated packages globally (/usr/local), use option -g;

npm outdated -g

npm outdated -g –depth=0 // Same as above, but finds at a given depth

npm config list
Spits out the npm’s configuration file’s list

npm config ls -l
Lists out all the default values of npm’s configuration file.

npm ls  OR npm list
Lists the dependencies and see the relationships of other dependent dependencies with version numbers

npm ls –depth=0
Lists only the primary dependencies. The other alternative is using the ‘tree’ command tree -d /usr/local/lib/node_modules

npm root
Gives the directory path where node moduels are installed. npm root -g gives the directory path where node modules are installed globally.

npm view {packageName} version
Ex: npm view angular version
Gives the package version that is installed locally. -g at the end of the command gives the package version installed globally.

Breakdown of NPM resources from NPM Documentation:

Using package.json with versioning’s and versioning details:

https://docs.npmjs.com/misc/semver

https://docs.npmjs.com/getting-started/using-a-package.json

https://docs.npmjs.com/getting-started/semantic-versioning

https://docs.npmjs.com/getting-started/using-tags

https://docs.npmjs.com/files/package.json

Creating and Publishing packages to npm registry:

https://docs.npmjs.com/getting-started/creating-node-modules

https://docs.npmjs.com/getting-started/publishing-npm-packages

NPM’s Dependency resolution, Duplication and DeDuplication

https://docs.npmjs.com/how-npm-works/npm2

https://docs.npmjs.com/how-npm-works/npm3

https://docs.npmjs.com/how-npm-works/npm3-dupe

https://docs.npmjs.com/how-npm-works/npm3-nondet

Javascript: A word with Spaces

Given a word “HELLO”, print the word with spaces “H E L L O”.

Naive Solution:

function spacing(a){
   var b = a.split(''), c = b[0];
   for(var i=1; i < b.length; i++){
       c += " " + b[i];
   }
   console.log(c);
}

spacing('hello');

The output is:

h e l l o

Using Javascript prototypes:

function SetString(stringName){
   this.stringName = stringName;
}

function SpacingFunction(){
   var b = this.stringName.split(''), c = b[0];
   for(var i=1; i < b.length; i++){
      c += " " + b[i];
    }
   console.log(c);
}

SetString.prototype.spacingFunction = SpacingFunction;

new SetString('hello').spacingFunction();

The output is:

h e l l o


Resources:

JavaScript Prototype in Plain Language

Javascript: Type Error vs Reference Error

In order to understand Type Error vs Reference Error, first we will need to know Variable Declaration vs Variable Initialization.

var x;

In this above statement, we can say that x is declared but not yet initialized.

var x = 5;

Here, we can say that x is declared and as well initialized.

Now, let’s say we would want to access the x’s property that has been declared but not initialized.

var x;
console.log(x);

This would result variable x to be

undefined

Now, let’s say that we would want to declare and initialize x to undefined and then access the x’s toString() method.

var x = undefined;
console.log(x.toString());

This would result in

Uncaught TypeError: Cannot read property ‘toString’ of undefined(…)

Now, let’s say we would like to access the x’s property thats been been declared as well as initialized.

var x = 5;
console.log(x.toString());

This would result

5   // Since 5 is declared and initialized as a number, 
    //and we were trying to convert it to a String.

Now, let’s say we would want to access a variable y that doesn’t exist in the scope (meaning that there is not presence of variable y with out any initialization or declaration)

console.log(y);

This would result in

Uncaught ReferenceError: y is not defined(…)


Happy Learning 🙂

Order of execution in Javascript

Given the below functions

function ME(){console.log("ME")};

function MYSELF(){window.setTimeout(function(){console.log("MYSELF")}, 0);}

function I(){
   return new Promise(function(resolve, reject){
      window.setTimeout(function(){resolve("hi");},5000);
   }
).then(function(response){
          console.log("I");
     }, function(error){
          console.log("error");
      }
)}

If I supposedly call these functions sequentially as shown below:

MYSELF();
I();
ME();

Here is the order the javascript engine (Google’s V8 if chrome) takes precedence of executing it.

The output would be:

ME    // The ME() function outputs its result in the first place because it gets executed immediately even though it is being called in 3rd line, and the main reason being, it has no timeouts and nothing gets listed to the browser’s window Object

MYSELF   // The MYSELF() function outputs its result the second place even though it is being called in the 1st place AND it has a timeout function which is set to 0 seconds, because the timeout function is bound to the window object of the browser and it takes an extra roundtrip for the browser to get the event listened on its window object.

I   // The I() function outputs its result in the third place even though it is being called in the 2nd place, because it uses the asynchronicity feature using the Javascripts Native Promise function and also the resolve function of Promise gets called after a timeout of 5 seconds.

Resources:

https://developers.google.com/web/fundamentals/getting-started/primers/promises

Find the middle element of the linked list in single pass – O(n) complexity

A linked list contains Nodes that are linked to each other.

Create a Node – A node consists of data of that node and some information about the next linked node

function Node(data, nextNode){
this.data = data;
this.nextNode = nextNode;
}

Create all nodes

Note: First Node from right. This would be our last node in sequence. The reference to next node would be null since this is our last node.

var n5 = new Node("5", null); 
var n4 = new Node("4", n5);
var n3 = new Node("3", n4);
var n2 = new Node("2", n3);
var n1 = new Node("1", n2);

// So here is the representation of the linked list nodes, that we just created.
// n1 (1, n2) –> n2 (2, n3) –> n3 (3, n4) –> n4 (4, n5) –> n5 (5, null)

Here is how the linked list looks

linkedlist

The Naive Solution to this problem would be in 2 passes (2 for loops), which takes O(n^2) worst case complexity

1st pass is to loop thru to get the count of nodes in linked list and
2nd pass is to loop thru find the middle element by dividing the Count of Nodes by 2

So, for example if there are 5 Nodes.

1st pass is to count the number of nodes = 5
2nd pass is to loop thru to get the middle element by dividing 5/2 = 2.5 (so in the middle element to be 3)

There is a better and a faster way to get this in 1 Pass (1 for/while loop), with O(n) complexity

Assign 2 pointers while looping.
1st pointer moves 1 element at a time.
2nd pointer moves 2 elements at a time (twice as faster as the 1st pointer)

Some theory/story:

Assume that Person A and Person B would like to reach a destination X from same starting point.

Assume that it would actually take 10 mins to reach destination X.

Assume that Person B walks 2 times faster than Person A, then by the time Person B reaches destination X, Person A is exactly half way thru.

So, lets give a starting point to our node n1.

var slowNode = n1;
var fastNode = n1;

// Check if nextNode is not null and nextNode of the nextNode 
// (2 Nodes from the current Node) is also not null
while(fastNode.nextNode != null && fastNode.nextNode.nextNode != null) {
// slowNode should be moving to the next element of the linked list sequentially
slowNode = slowNode.nextNode;
// Now the fastNode should be twice as faster as the slowNode
fastNode = fastNode.nextNode.nextNode;
}

console.log(slowNode.data);

Relevant Code using Java

public class MiddleElementLinkedList {

	/**
	 * @param args
	 */
	public static void main(String[] args) {
		// TODO Auto-generated method stub
		
		// Create Linked List Nodes
		
		LinkedListNode n5 = new LinkedListNode("5", null);
		LinkedListNode n4 = new LinkedListNode("4", n5);
		LinkedListNode n3 = new LinkedListNode("3", n4);
		LinkedListNode n2 = new LinkedListNode("2", n3);
		LinkedListNode n1 = new LinkedListNode("1", n2);
		
		// Set the starting point
		
		LinkedListNode slowNode = n1;
		LinkedListNode fastNode = n1;
		
		while(fastNode.getNextNode() != null && fastNode.getNextNode().getNextNode() != null){
			slowNode = slowNode.getNextNode();
			fastNode = fastNode.getNextNode().getNextNode();
		}
		
		System.out.println("Middle Element: " + slowNode.getData());

	}
	
	public static class LinkedListNode {
		private String data;
		/**
		 * @return the data
		 */
		public String getData() {
			return data;
		}

		/**
		 * @param data the data to set
		 */
		public void setData(String data) {
			this.data = data;
		}

		/**
		 * @return the nextNode
		 */
		public LinkedListNode getNextNode() {
			return nextNode;
		}

		/**
		 * @param nextNode the nextNode to set
		 */
		public void setNextNode(LinkedListNode nextNode) {
			if(nextNode == null)
				this.nextNode = null;
			this.nextNode = nextNode;
		}

		private LinkedListNode nextNode;
		
		LinkedListNode (String data, LinkedListNode nextNode) {
			this.data = data;
			this.nextNode = nextNode;
		}
	}

}

Here is how the linked list looks in Java

linkedlistjava


Happy Coding !!!

A few Javascript Gotchas

Regular Equality vs Strict Equality.

{} === {}

false // Even though they are empty objects, strict equality not only checks for type & value, but also checks the created instance. The created instance is different for each new Object

{} == {}
false

{x:5} == {x:5}
false

{x:5} === {x:5}
false

0 === false
false

0 == false
true

0 == 0
true

0 === 0
true

1 == 1
true

1 === 1
true

new Object() == new Object()
false

new Object() === new Object()
false

Object.create([]) === Object.create([])
false

Object.create([]) == Object.create([])
false

var x =””;
if(x){console.log(“123”)} else{console.log(“456”)}
456

var x = [];
if(x){console.log(“123”)} else{console.log(“456”)}
123

“” == 0
true

[] == “”
true

“” === 0
false

[] === “”
false

“” == ”
true

“” === ”
true

typeof(”)
“string”

typeof(“”)
“string”

” instanceof String
false

“” instanceof String
false

new String(“”) instanceof String
true

typeof(new String())
“object”

“”.toString == new String(“”)
false

“”.toString() == new String(“”)
true

“”.toString() == new String(“”).toString()
true

“”.toString === new String(“”)
false

“”.toString() === new String(“”)
false

“”.toString() === new String(“”).toString()
true

[] == new Array[];
VM362:1 Uncaught SyntaxError: Unexpected token ]

[] === new Array[];
VM363:1 Uncaught SyntaxError: Unexpected token ]

typeof(“”)
“string”

typeof(”)
“string”

typeof([])
“object”

typeof(Object)
“function”

typeof(new Array())
“object”

typeOf(new Array()) // typeOf is not defined, O in red is capital
VM418:1 Uncaught ReferenceError: typeOf is not defined(…)(anonymous function)

[].constructor.toString().indexOf(“Array”) > -1
true

[] instanceof Array
true

typeof null
“object”

typeof {}
“object”

{} instanceof Object
VM1270:1 Uncaught SyntaxError: Unexpected token instanceof

var t = {}
t instanceof Object
true

Object instanceof t
VM1385:1 Uncaught TypeError: Right-hand side of ‘instanceof’ is not callable(…)

typeof undefined
“undefined”
Note that typeof undefined is undefined which is wrapped in string quotes, but not a string.

typeof (typeof undefined)
“string”
Since the (inner) typeof undefined is undefined wrapped in string quotes, and the (outer) typeof (“undefined”) is being assumed as a string.

typeof when variable is defined.

var d = {};

typeof d === undefined
false

typeof d === “undefined”
false

d === “undefined”
false

d === undefined
false

typeof when variable is not defined

typeof u === undefined
false

typeof u === “undefined”
true

u === “undefined”
VM455:1 Uncaught ReferenceError: u is not defined
at <anonymous>:1:1
(anonymous) @ VM455:1

u === undefined
VM458:1 Uncaught ReferenceError: u is not defined
at <anonymous>:1:1

Numbers

1/-0 > 0
false

1/-0
-Infinity

-Infinity == 0
false

-Infinity > 0
false

-Infinity === 0
false

-Infinity > 1
false

-Infinity == 1
false

-Infinity === 1
false

Infinity == NaN
false

Infinity === NaN
false

1 instanceof Number
false

1/0 instanceof Number
false

1/0
Infinity

Infinity instanceof Number
false

typeof(“”)
“string”

typeof(Infinity)
“number”

new Number(1) instanceof Number
true

99.99 instanceof Number
false

typeof(99.99)
“number”

new Number(99.99) instanceof Number
true

typeof(NaN)
“number”

NaN instanceof Number
false

new Number(NaN)
Number {[[PrimitiveValue]]: NaN}

new Number(NaN) instanceof Number
true

NaN == Number
false

NaN === Number
false

new Number(NaN) === Number
false

new Number(NaN) == Number
false

NaN == undefined
false

NaN === undefined
false

NaN === ”
false

NaN == ”
false

NaN == null
false

NaN === null
false

isNaN(NaN)
true

Objects/Functions

var e = function(){};
var r = function(){};
var e1 = new e();
var r1 = new r();

e == r
false

e === r
false

typeof e
“function”

e instanceof function
VM352:1 Uncaught SyntaxError: Unexpected end of input

function instanceof e
VM387:1 Uncaught SyntaxError: Unexpected token instanceof

e1 == r1
false

e1 === r1
false

e1 instanceof r1
VM750:1 Uncaught TypeError: Right-hand side of ‘instanceof’ is not callable(…)(anonymous function) @ VM750:1

e1 instanceof Function
false

e1 instanceof Object
true

typeof(e1)
“object”

Assignments

var a = [1,2,3];
var b = [4,5,6];

a = b
[4, 5, 6] // This the value of a

a
[4, 5, 6] // a assignment to b copied over all values of b

b
[4, 5, 6] // No changes to b, so b still had reference to its original values

Pass by reference/value

var func = function(a) { var tempArray = [4,5,6];   a = tempArray;   console.log(a);}

func([1,2,3]);

[4,5,6] // Even though we pass by reference with a different value, the assigned variable value would be overridden with internal assignment (if any).

Which is best to use: typeof or instanceof?

http://stackoverflow.com/questions/899574/which-is-best-to-use-typeof-or-instanceof

Area, Perimeter and Type of a Triangle.

Problem Statement: Given 3 sides of a triangle, find the area, perimeter and determine the type of the triangle, if isosceles, equilateral, or scalene. Also, check for Right Angled Triangle. /*Skipping Acute and Obtuse triangle types.*/

Prompt 3 user inputs for sides of the triangle and a dialog to output.

Solution:

import javax.swing.JOptionPane;

public class Triangle {

	/**
	 * This is a class to determine if the given side lengths form a triangle.
	 * It lets the user know the type of the triangle based on the given side lengths.
	 * Also, it gives the Perimeter and Area of the triangle.
	 * @param args
	 */
	public static void main(String[] args) {

//		String sideA, sideB, sideC;
		double a,b,c;
		a = Double.parseDouble(JOptionPane.showInputDialog(null,"Please input side 1 length of the triangle: ", "Triangle Side 1", JOptionPane.QUESTION_MESSAGE));
		b = Double.parseDouble(JOptionPane.showInputDialog(null,"Please input side 2 length of the triangle: ", "Triangle Side 2", JOptionPane.QUESTION_MESSAGE));
		c = Double.parseDouble(JOptionPane.showInputDialog(null,"Please input side 3 length of the triangle: ", "Triangle Side 3", JOptionPane.QUESTION_MESSAGE));
		
		// For right angled triangle, as per mathematics, square of the hypotenuse is equal to the sum of the squares of the other 2 sides. h^2 = a^2 + b^2 where h is hypotenuse (can be any side a,b,c)
		// So we first need to determine the hypotenuse
		
		double h = a > b ? (a > c ? a : c) : (b > c ? b : c);
		
		// Permiter of the triangle
		double p = a + b + c, s = p/2;
		
		//Area of triangle
		double areaOfTriangle = Math.sqrt(s * (s-a) * (s-b) * (s-c));
		
		// Check to see if the triangle is equilateral -- All sides should be equal
		if(a == b && b == c){ // no need to check a == c the value always holds true.
			JOptionPane.showMessageDialog(null, "Based on the given sides, the triangle is a equilateral." +
					"\nPerimeter of the triangle is " + p + 
					"\nArea of Triangle is " + areaOfTriangle);
		} 
		// Check to see if the triangle is isosceles -- At least 2 sides should be equal
		else if(a == b || b == c || c == a) {
			JOptionPane.showMessageDialog(null, "Based on the given sides, the triangle is a isosceles." +
					"\nPerimeter of the triangle is " + p + 
					"\nArea of Triangle is " + areaOfTriangle);
		}
		// Check to see if the triangle is right angle -- Can be verified if sum of squares of each of the sides is equal to twice the square of the hypotenuse. 
		//Ex : 3^2 + 4^2 + 5^2 = 2 * h^2 where h is the hypotenuse
		else if(Math.pow(h,2) * 2 == Math.pow(a,2) + Math.pow(b,2) + Math.pow(c,2)) {
			JOptionPane.showMessageDialog(null, "Based on the given sides, the triangle is a right angled triangle." +
					"\nPerimeter of the triangle is " + p + 
					"\nArea of Triangle is " + areaOfTriangle);
		}// Check to see if the triangle is scalene -- no sides should be equal
		else if(a != b && b != c && a != c) {
			JOptionPane.showMessageDialog(null, "Based on the given sides, the triangle is scalene." +
					"\nPerimeter of the triangle is " + p + 
					"\nArea of Triangle is " + areaOfTriangle);
		}
		// Check if the triangle is not a triangle
		else if(a > b + c || b > a + c || c > a + b ) {
			JOptionPane.showMessageDialog(null, "Based on the given sides, the triangle is not a triangle");
		}
		else {
			JOptionPane.showMessageDialog(null, "Based on the given sides, the triangle is a normal triangle." +
					"\nPerimeter of the triangle is " + p + 
					"\nArea of Triangle is " + areaOfTriangle);
		}
	}

triangle


mailto: protocol with attachment in javascript?

Hello Folks,

It’s been quite a while I haven’t word pressing. I wanted to take some time out to blog a few helpful coding tips & tricks that I am coming across these days.

A few days back, my colleague had a requirement on opening a Outlook email using simple javascript which also includes a attachment to the outlook email. Well google’ing a bit found the answer to do so, but including a attachment to that is being hosted on a different server (OnBase Document Server) was a challenge.

Clicking this button below opens the Mail Draft Dialog Window (Mail is a default application for eMails in Mac OSX) / Outlook Draft Dialog Window (if Windows OS), with user set TO (sent by) email address, Subject Line (Outlook takes in maximum of 255 characters on Subject Line), Message Body. Note that the FROM (received from) email address will be decided by the default account set in Mail App/Outlook App.

mailTo

<a href="mailto:rc@rakeshchouhan.com?subject=Test%20Mail-To-Talk"></a>
According to RFC 2368 you can’t add an attachment to a message with the mailto: URL scheme due security reasons:

The user agent interpreting a mailto URL SHOULD choose not to create a message if any of the headers are considered dangerous; it may also choose to create a message with only a subset of the headers given in the URL. Only the Subject, Keywords, and Body headers are believed to be both safe and useful.

Conclusion:

mailto: only supports header values or text/plain content.


Happy learning 🙂

Convert a Maven project to eclipse project..

Given that a project is built in Maven, and you would like to import the same project in eclipse IDE. Or sometimes developers intentionally do not check in .project, .settings files to the repository. These files are generated by the eclipse IDE.

cd to the project directory

mvn eclipse:eclipse

Note: ensure that the project directory has pom.xml

Pascal’s Triangle with O(n^2) worst case.

public class PascalTriangle {
    
    public static void main(String[] args) {
        showPascal(9);
    }
    
    // This takes O(n^2) constraint.
    public static void showPascal(int rows){
    	// rows = Number of Pascal triangle rows to show up
    	// i = loop thru each row.
    	for(int i = 0; i<rows; i++)
    	{
    		// Start from 1. So, initialize the first number to 1
    		int number = 1;
    		// Give the spacing - Ex: If rows is 9, then the spacing  would 18 (because I specified the args as "", else if I specify args as "_", you would notice that the spacing is 17 and on 18th bit there would be a '_' ) for the first iteration of i = 0.
    		System.out.format("%"+(rows-i)*2+"s", "");
    		// j = loop thru  each column of a row by CALCULATing and display
    		for(int j=0; j<=i; j++)
    		{
    			// Give 3 more spacing and print the number on the 4th bit.
    			System.out.format("%4d", number);
    			
    			// Formula to calculate each column.
    			number = number * (i - j)/(j + 1);
    		}
    		// Print a empty line after each row.
    		System.out.println();
    	}
    }

Here is how the output look like:

pascaltriangleoutput

Happy Coding !!!

WebPage Loading & Rendering – How fast it that?

Hello There…

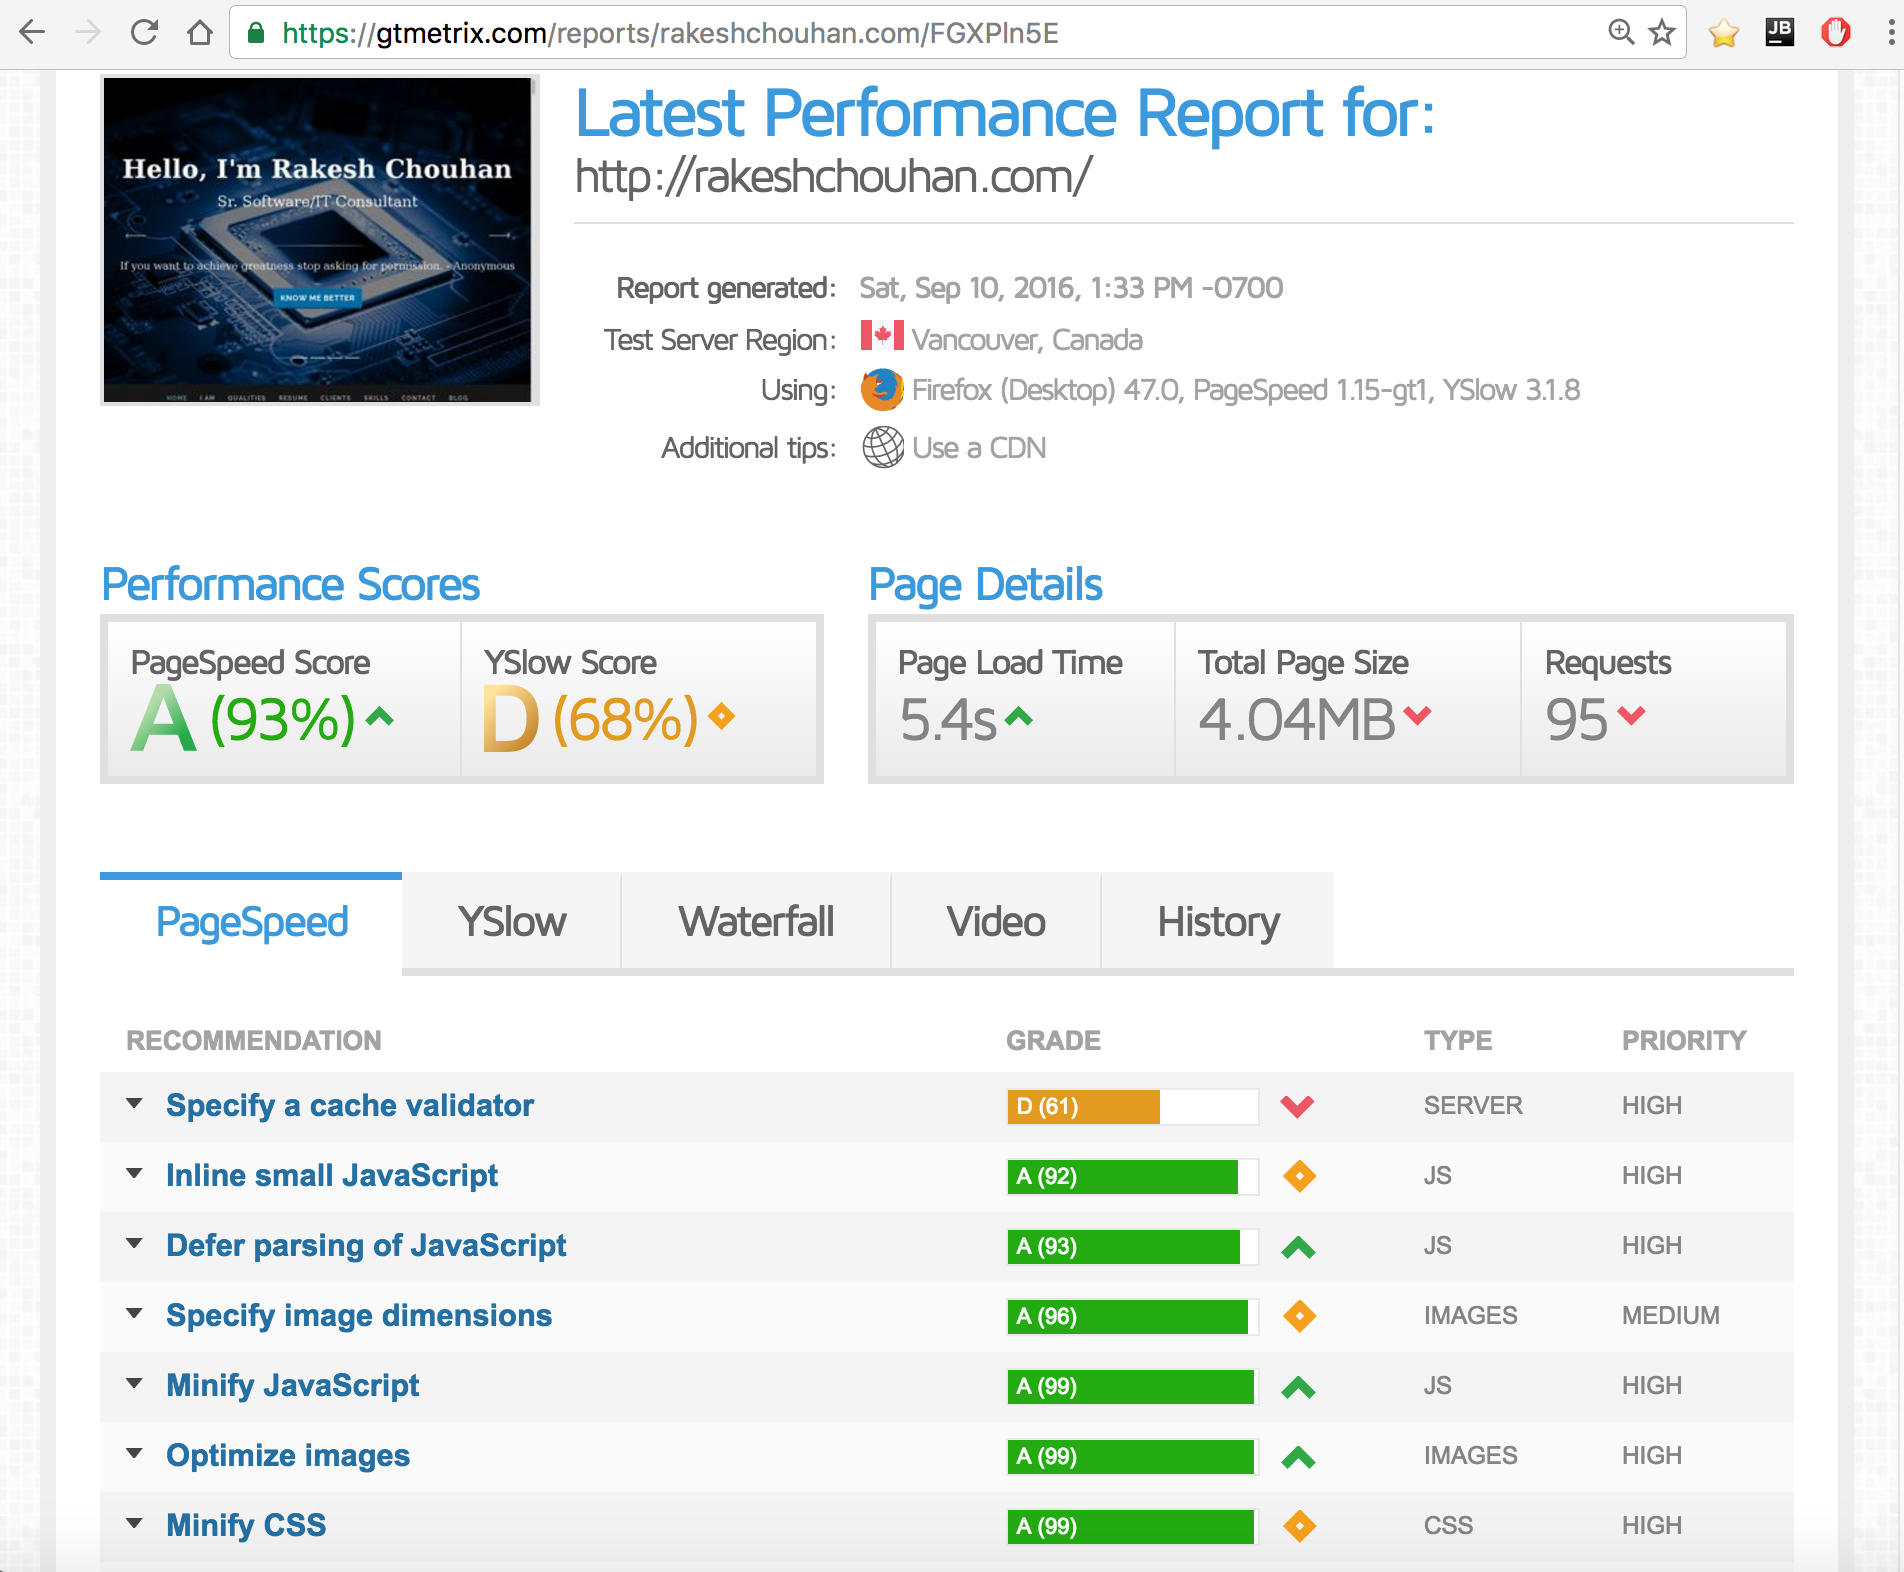
For the past few days, I was speed testing how fast my website loads and researching on how can I improve it. During this research, I came across many different ways and different techniques to improve a web page to load faster and render with a  very minimal memory footprint, from coding standpoint to server configuration.

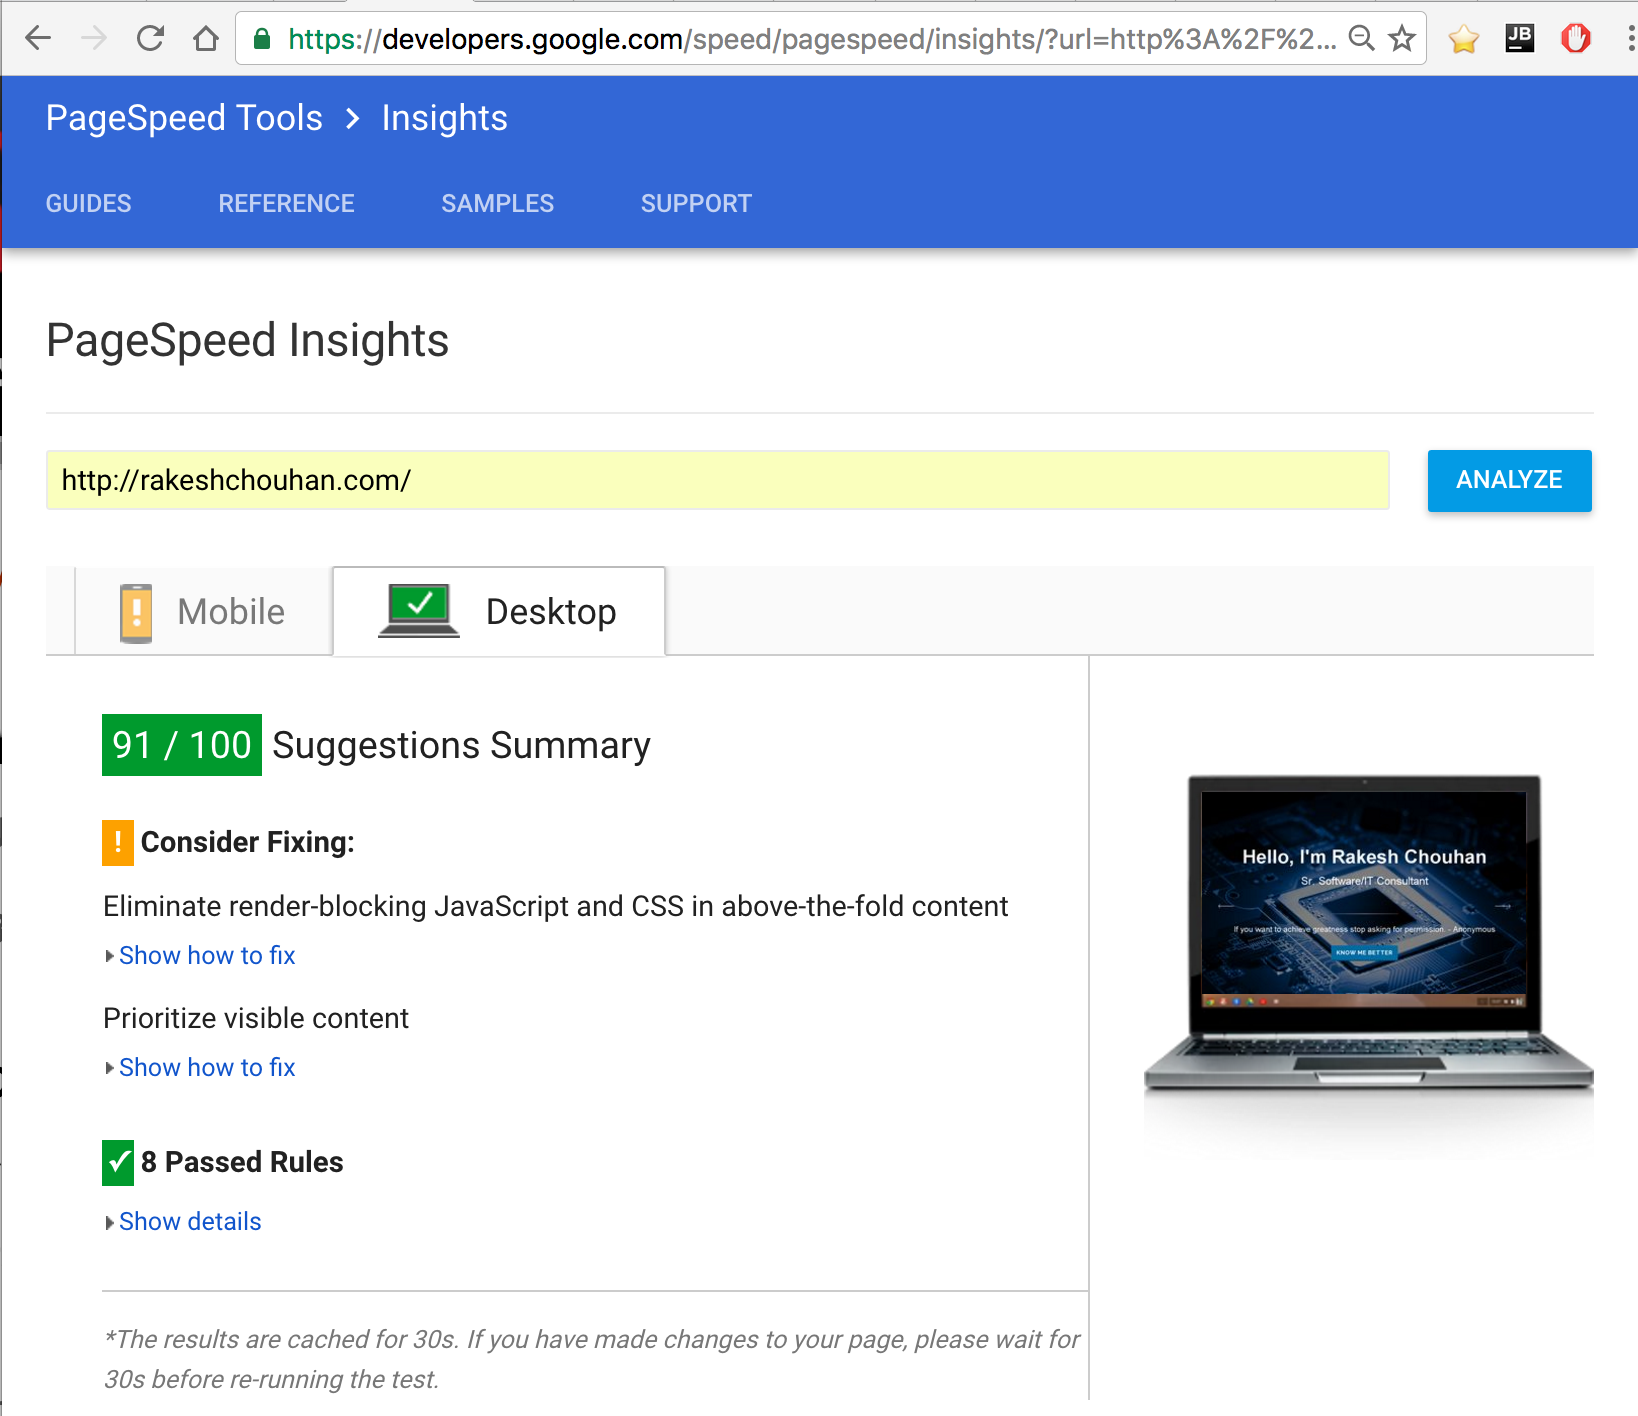
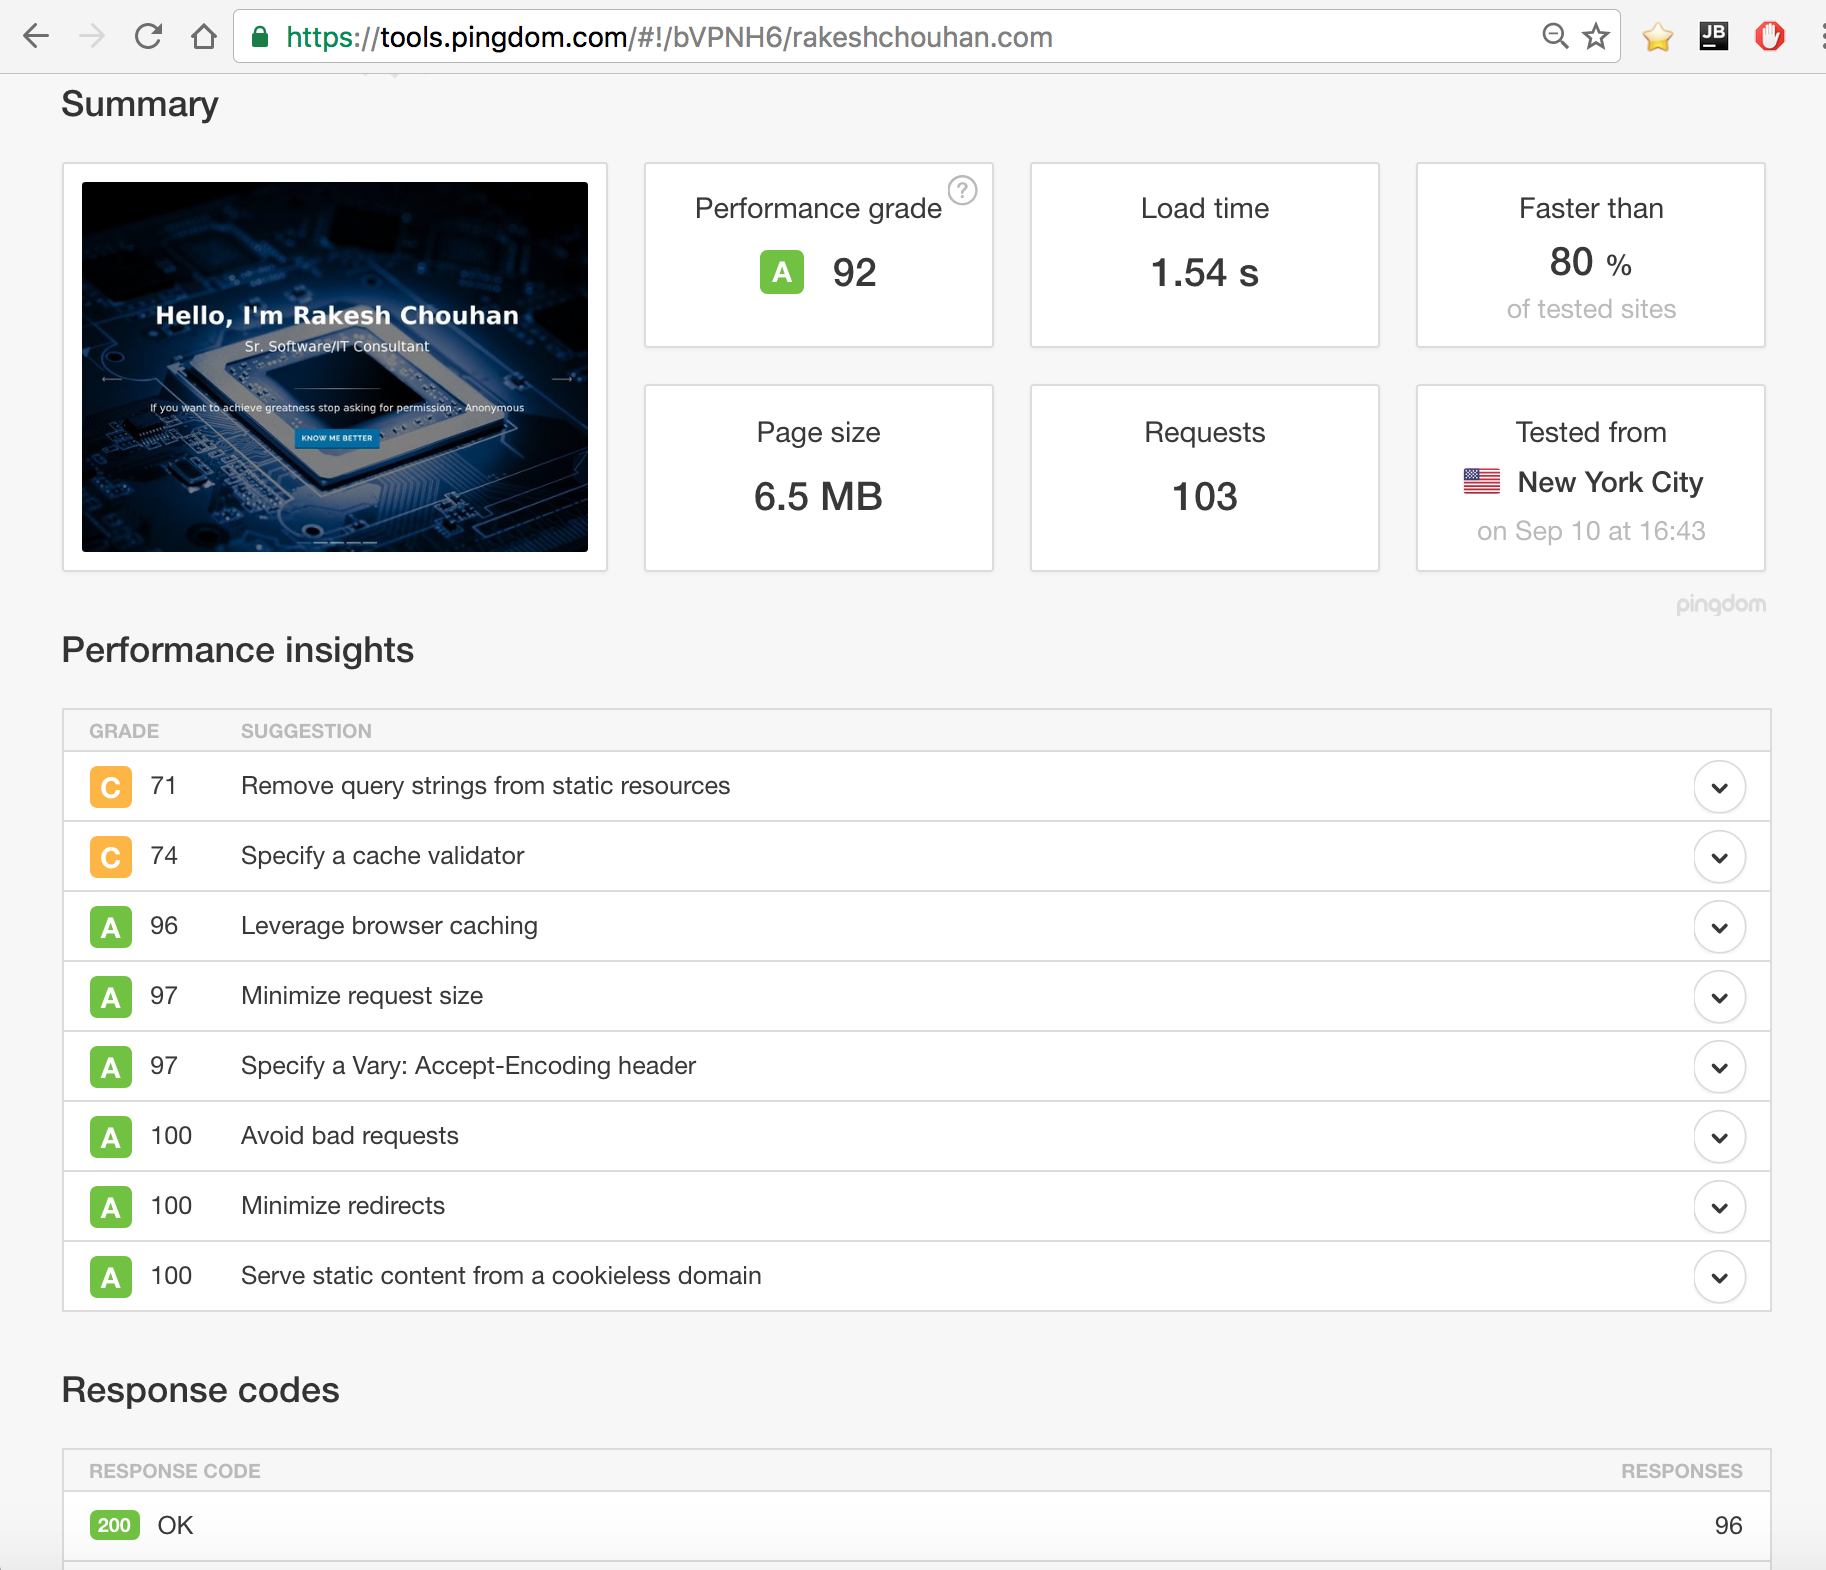
Here are the metrics of my website’s performance, studied and tested with…

  1. Google Developers Page Speed Performance toolgoogledevelopersperformanceinsights
  2. Pingdom Website Speed Testpingdomspeedtest
  3. GTmetrix Performance Toolgtmetrixperformance


Notice that each test tool provides different performance test results. All the results are approximated based on their test strategy. However, there may be many other test tools to test out the website’s speed, but the important point to note is, these tools lets us know what went wrong and what can be done to improve it.

Here are some of things I had to do for improving..

Within HTML, JS & CSS files

  1. Minifying HTML, Javascript’s and CSS.
  2. Using ‘async’ and ‘defer’ (sometimes together where ever required) while loading javascript files.
  3. Inlining small CSS and scripting small JS within main document to minimize requests.
  4. Placing CSS in the document head.
  5. Sizing Content to Viewport.
  6. Serving Scaled images (If images are small sized, use data-uri’s instead)

      Within .htaccess file. (This file exists on the domain root folder)

  1. Leverage Browser Caching by specifying a “Cache-Control” to all Files Matching html, js, css, etc…
  2. Specifying a “Vary: Accept-Encoding header” to advise public proxies to store both compressed and uncompressed version of the resource.
  3. Specifying a ETag Header to validate Cache for all resources ending with file names.
  4. Ensuring landing page redirects are avoided (enabled by default)
  5. Ensuring gzip compression (enabled by default)
  6. Ensuring Keep-Alive is enabled (enabled by default in http.conf. If shared host, then we would have to set it manually in .htaccess)

Having done that, I do had some unanswered questions during this research.

  1. How to leverage browser caching andE-Tag (Cache Validator) to certain resources that do not end with file name in .htaccess file?Example for Resource URL’s:
    http://fonts.googleapis.com/css?family=Lato:400,700
    https://maps.googleapis.com/maps/vt?pb=!&#8230;

    The above resource URL’s DO NOT END with any file names.

  2. Since these resources are not cached by some proxy caching servers. How to remove query string and encode the parameters into the URL for resources having “?” (see resource URLs example from Q.1 above).
  3. How to prioritize visible content for rendering “above-fold-content” (as suggested in the Google developers page test tool), when your page is just one single page template?

Here are the resources that I was going through this research process..


Happy Learning 🙂

Well Known TCP/IP (Reserved) Ports

In TCP/IP and UDP networks, a port is an endpoint to a logical connection and the way a client program specifies a specific server program on a computer in a network. Some ports have numbers that are pre-assigned to them by the IANA, and these are called the “wellknown ports” which are specified in RFC 1700.

Port numbers range from 0 to 65536, but only ports numbers 0 to 1024 are reserved for privileged services and designated as wellknown ports. This list of wellknown port numbers specifies the port used by the server process as its contact port.

Note: Important ones are highlighted in bold.

Port Number Description
1 TCP Port Service Multiplexer (TCPMUX)
5 Remote Job Entry (RJE)
7 ECHO
18 Message Send Protocol (MSP)
20 FTP Data
21 FTP Control
22 SSH Remote Login Protocol
23 Telnet
25 Simple Mail Transfer Protocol
29 MSG ICP
37 Time
42 Host Name Server (Nameserv)
43 WhoIs
49 Login Host Protocol (Login)
53 Domain Name System (DNS)
69 Trivial File Transfer Protocol (TFTP)
70 Gopher Services
79 Finger
80 HTTP
103 Standard
108 SNA Gateway Access Server
109 POP2
110 POP3
115 Simple File Transfer Protocol (SFTP)
118 SQL Services
119 Newsgroup (NNTP)
137 NetBIOS Name Service
139 NetBIOS Datagram Service
143 Interim Mail Access Protocol (IMAP)
150 NetBIOS Session Service
156 SQL Server
161 SNMP
179 Border Gateway Protocol (BGP)
190 Gateway Access Control Protocol (GACP)
194 Internet Relay Chat (IRC)
197 Directory Location Service (DLS)
389 Lightweight Directory Access Protocol (LDAP)
396 Novell Netware over IP
443 HTTPS
444 Simple Network Paging Protocol (SNPP)
445 Microsoft-DS
458 Apple QuickTime
546 DHCP Client
547 DHCP Server
563 SNEWS
569 MSN
1080 Socks

@Courtesy: http://www.webopedia.com/quick_ref/portnumbers.asp

Happy Learning !!!

H5 – Are you about to add an image to your Web Application ? Think about self encoded data-uri’s.

There are 2 ways to add an image to your html page.

1) Add it inline using your tag within html file
2) Add it using CSS

Everyone knows how to do it the both ways, but the best way to do is by using base64 encoder and adding the content data uri to the image.

I use a simply encoder utility tool from WebSemantics @ http://websemantics.co.uk/online_tools/image_to_data_uri_convertor/

The above utility tool does not allow images with large sizes, and here is another tool which does the same..

http://www.askapache.com/online-tools/base64-image-converter/

However, there are many tools that are available in the market. You can also have your own base64 algorithm to encode the images for security purposes (like avoiding “HOT LINKING“).

Given the input image, this tool gives you a base64 encoded data, which you would want to use it to attach it to html or css.